Project 3: Graph Crypto
- Due before 23:59 on Monday, November 28
- Submit using the submit program
as
301 proj 3.
1 Background
File Fingerprinting with Hashes
You know by now that hash functions can be used for many things. The last project was about cracking password authentication by searching for hashes of known passwords. We also saw in a totally different context that very simple hash functions can be used to make fast map and set data structures.
Another important use of hash functions (specifically, cryptographic hash functions) is in file fingerprinting. The idea is that you compute a small hash of a potentially large file, and then someone who downloads that file can compute the hash themself in order to verify the download was not corrupted. This makes sense especially if it's easy to transmit small message securely (like the hash), but large downloads might be intercepted or corrupted somehow.
A common example of this can be seen in online software downloads,
where the hash of the download is published on the website along with various
links to download the file. For instance, on the
Kali Linux download page (a Linux
version used for penetration testing),
you see all the versions of the operating system, and then a column for the SHA1Sum,
which is a hash you can compute by running sha1sum filename from
the command-line after downlaoding the file. That way you can be sure that the
file you downloaded is legit and uncorrupted, before you take the (potentially dangerous!)
step of installing this operating system.
Similarly, you can use file hashes to make sure that any kind of digital data has not been tampered with or modified. Similarly, file hashes can be used to identify potentially harmful or dangerous files - such as malware or child pornography - without having to actually share the files themselves. That is, by storing the hashes of millions of malware programs, your antivirus can detect whether you've downloaded such a file without sharing the actual malware program with you in the first place.
There are generally three properties that we want from a good file fingerprinting hash function:
- Fast to compute: It shouldn't take too long to compute the hash of even a very large file.
- Tamper-evident: If even one small part of a file is changed, the hash should change also.
- Hard to forge: Given a target hash value, it should be hard to create a new file that would have exactly that hash.
Expander graphs and the Zémor hash
In the early 1990s there were many proposals for file fingerprinting hash functions. One that you have probably heard of is SHA-1, which was developed by the NSA. This hash function is similar in many ways to AES encryption and is based on scrambling things a lot in ways that "should" be impossible to un-scramble.
Some alternatives proposed by researchers were based on proven properties of expander graphs. These are a kind of graph where each node has very few edges adjacent to it, but where the nodes very quickly spread out so that the graph "expands" quickly from any given starting point. By following along the graph from some starting point, based on the bits of the file you're hashing, you should end up at a seemingly-random vertex on the graph. The index of the ending vertex then becomes the hash value.
The first such hash function proposed was in the paper "Hash Functions And Graphs With Large Girths" by Gilles Zémor in 1991, and we'll call this a "Zémor hash". The hash function is determined by a certain class of directed graphs that is defined for any prime number \(p\) with the following properties:
- The graph has \(p^3 - p\) vertices and \(2(p^3-p)\) edges.
- Each vertex is numbered starting from 0.
- The out-degree of each vertex is exactly 2, meaning every vertex has 2 outgoing edges.
- The two outgoing edges from each vertex are always in a certain order. You can think of them as edge 0 and edge 1.
- It's possible to compute the outgoing edges from any given vertex using some matrix math that you can read about in the paper above if you're interested.
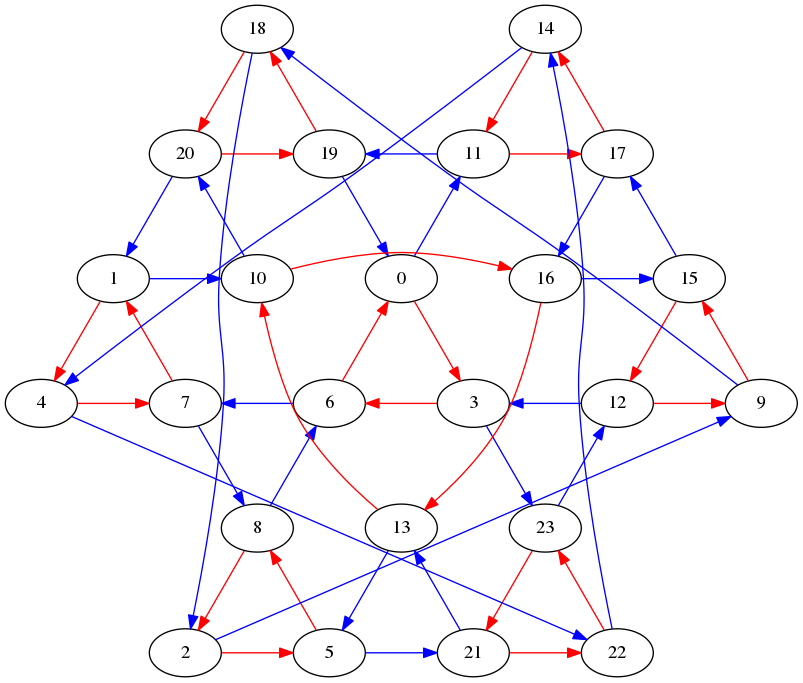
Here is a picture of the Zémor graph with \(p=3\). Each "edge 0" is colored red, whereas each "edge 1" is colored blue.
2 Overview
In this project, you will be implementing, using, and then (hopefully) cracking the Zémor hash function. The main parts of the project are:
- Part 1 (code): Write a program to compute the Zemor hash of a given bit sequence, string, or file. This is the starting point of the project and I expect everyone to complete this part 100% correctly.
- Part 2 (hash): Construct a few files you'd like to share with the class and upload them to a web page along with their hash values so we know they're legit.
- Part 3 (crack): Once you see someone else's file, try to corrupt it or insert your own message somehow, in a way that doesn't change the hash value so no one can tell it's been changed.
3 Part 1: Implement the Zémor hash (up to 85 points)
Starter code and example graphs
Here are some files that you'll want to get started:
You can get all these files at once by downloading the file
proj3.tar.gz
and running tar xzvf proj3.tar.gz
How the hash function works
You are going to implement a hash function for directed expander graphs. The way it works is that, starting from node 0 in the graph, you follow along a path of 0 edges (red) or 1 edges (blue) according to the bits in the message, and then the hash is the number of the vertex you land on in the end.
For example in the graph pictured above (which is in fact Zemor(3)),
say you wanted to hash a sequence of four bits 0110. This is what
would happen:
- The first bit is 0. So follow the first (red) edge from node 0, to node 3.
- The second bit is 1. So follow the second (blue) edge from node 3, to node 23.
- The third bit is 1. So follow the second (blue) edge from node 23, to node 12.
- The fourth bit is 0. So follow the first (red) edge from node 12, to node 9.
Since this "walk" of the graph ended on node 9, your program would output 9
as the hash value.
An even simpler example in the small.dot graph that you have downloaded,
and which is pictured below:
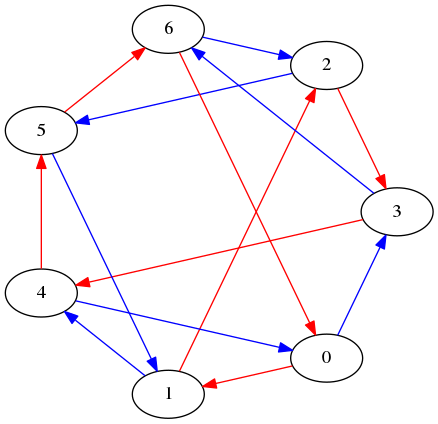
(Note that this is not a Zémor graph, just a graph with out-degree 2 from every node.)
Using this graph, the hash value of the bit sequence 0110 would be 1.
Hashing strings and files
Usually data that we want to hash doesn't come as bit sequences but rather as bytes.
To convert a string to a sequence of bytes in Python, you can use the .encode()
method. To get a sequence of bytes from a file, you would open the file in binary mode like
open("file.txt", "rb") and then use the read() method of
file objects.
Once you have a sequence of bytes (either from a string or from an entire file), you need to go through each bytes and go through the 1/0 bits of that byte! For this project, we will use "big-endian" order, meaning you start with the most significant bit in each byte.
For example, in hashing the string 'Hi', you would first encode each letter as
an ASCII byte, then go through the bits of each byte in left-to-right order, like:
Message:                     H                                 i
Bytes:                       72                               105
Binary:                   01001000                          01101001
Binary:          0   1   0   0   1   0   0   0   0   1   1   0   1   0   0   1
zemor(3) hash:  0-> 3->23->21->22->14->11->17->14->11->19-> 0-> 3->23->21->22->14
small.dot hash: 0-> 1-> 4-> 5-> 6-> 2-> 3-> 4-> 5-> 6-> 2-> 5-> 6-> 2-> 3-> 4-> 0
So the hash of 'Hi' would be 14 using Zemor(3) and
it would be 0 using small.dot.
Your assignment
What you need to do for this part is write a program expandhash.py
that reads command-line arguments to hash either a bit sequence, or a string, or a file,
using either a specific graph (specified by a dot file) or a Zémor graph (specified by the
prime p). I've written the command-line stuff for you so that you can really just focus on
writing the following pieces:
- A Graph class that can be created from a given dot file of a directed graph.
(Should be quite similar to what you needed for some labs!)
All you really need from this class is a
neighbors()function to return the outgoing edges of a given node in the proper order. - An
ExpanderHashclass that can be created from a graph object that is either the Graph class from a specific dot file, or theZemorclass that I'm giving you. - Three methods in the
ExpanderHashclass,hashBits(bitstring),hashString(regularstring), andhashFile(filename), that each return a hash value of their input.
I suggest you start with just a graph from a specified dot file, and the hashBits method,
test this carefully, and then proceed from there. If you do things well, there should be
no difference in your hash functions whether it's a dot-file Graph or a Zemor graph!
Here are some example runs of how this should work once it's all implemented:
$ python3 expandhash.py -g small.dot -b 0110
1
$ python3 expandhash.py -g zemor3.dot -b 0110
9
$ python3 expandhash.py -p 3 -b 0110
9
$ python3 expandhash.py -g small.dot -b 010110110
5
$ python3 expandhash.py -g zemor3.dot -b 010110110
1
$ python3 expandhash.py -g small.dot -s Hi
0
$ python3 expandhash.py -g zemor3.dot -s Hi
14
$ python3 expandhash.py -p 3 -s Hi
14
$ python3 expandhash.py -p 19 -s Hi
1971
$ python3 expandhash.py -g zemor3.dot -f zemor3.dot
18
$ python3 expandhash.py -p 3 -f zemor3.dot
18
$ python3 expandhash.py -p 23 -f zemor3.dot
5174
$ python3 expandhash.py -g zemor3.dot -s CubsWin
11
$ python3 expandhash.py -p 3 -s CubsWin
11
$ python3 expandhash.py -p 307 -s CubsWin
20086290
4 Part 2: Hashing some files and posting them (up to 97 points)
Now that your program works, it's time to test it out! Create three files (plain text is fine) that each have some sort of message from your classmates in them. I don't really care what the content of these files is, except that they should be relatively small (at most 1MB, probably far smaller), and of course they shouldn't be anything you would be embarassed to show your mother.
Next, choose three primes for the Zémor hash. Your first prime should be between 50 and 100, the second one should be between 500 and 1000, and the last one should be larger than 10000. You will compute the hashes of each file with one of these \(p\) values, then upload them to a website, in the following sequence:
- Run a program on the lab machine, under your own username, to indicate a prime value \(p\), a hash value, and a filename.
- Use the web interface to upload a file with that filename.
- If the hashes match, your file will appear on the website for anyone to download and check the hash.
The program for you to run on the lab machines is subhash and it
doesn't need any command-line arguments.
(If that doesn't work by itself, try the full pathname
~roche/301/pbin/subhash)
5 Part 3: Cracking the hashes (100 points and beyond)
After everyone has had a chance to upload their files, the cracking will begin! Your goal is to upload new files to overwrite someone else's file, that match the same hash.
Important: To avoid one person getting all the easy ones, you may only crack at most one message from each size prime (small, medium, and large).
You will earn two points for each message that you are successfully able to alter in any way while getting the same hash, and five points if your altered message clearly identifies you (by name or otherwise) as the one who did it. (Note that the second one is harder, because it means you can't just overwrite the original file with random garbage bytes that happen to have the same hash value.)
Besides posting your altered messages on the website, you must also submit a README with an explanation of how you did it (along with any code that you used).